Kettles with rings and head pins
A slightly different way to make really cool necklaces and bracelets: chain stitching with jump rings. This creates more space between the chain stitches, giving you the opportunity to add charms, for example. But that's not necessary! It can be a nice way to add a bit more space to your necklace without too much extra work.
This technique is a bit more challenging than average. But once you've mastered it, you're good to go! You can make both necklaces and bracelets this way, and earrings are also a lot of fun to make with this technique. It's a versatile way to make jewelry and a lot of fun to experiment with.

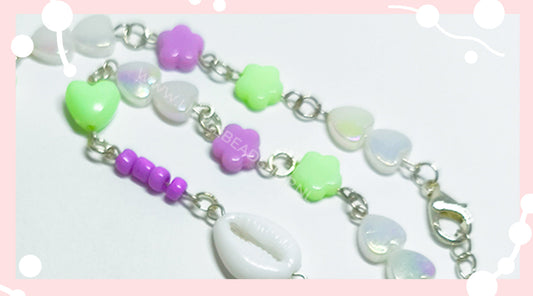
This necklace is made using this technique, partly to accommodate the charms at the bottom of the chain, but also to make it appear more spacious.
Want to know what kettling is? Check out this blog!
Now let's move on to the explanation of this jewelry technique. As I mentioned, it's very similar to the standard technique described in the blog post above. You just need a bit more material: hoops!
What do you need?
- head pins
- 1 clasp and 1 extension chain
- rings
- beads and charms of your choice
Tools required: cutting pliers, flat nose pliers and round nose pliers
Step 1
Thread the bead onto the head pin and grab your round-nose pliers. Use the pliers to pinch the head pin, about a centimeter above the bead. This ensures you have enough space to create an eyelet. The further you grip the pliers, the thicker the pliers become, and therefore the larger your eyelet will be. I usually leave a half-centimeter gap on the pliers so the eyelet is roughly the same size as the existing eyelet on the head pin. (See photo 1)


Step 2
Now, use your round-nose pliers to bend the head pin. Don't tighten it all the way against the bead; always leave a little slack. About 1 to 2 millimeters is sufficient.
Step 3
Now that you've created a nice eye, it's time to turn it back so it looks the same as the existing eye. Turn the eye back a bit, as shown in the photo below.


Step 4
Now it's time to cut off the remaining piece. Do this with wire cutters, as close to the wire stem as possible. Always make sure you hold the piece of metal you're cutting. This way, it can't get in your eyes while you're cutting!
Step 5
Now that you've cut the piece, there may be a gap between the end and the beginning of the eyelet. Therefore, bend the end towards the beginning of the eyelet to ensure a nice, closed eyelet (see photo).

Step 6
Now open a jump ring. Always do this by bending one end of the jump ring toward or away from you, as shown in the photo. If you bend the end to the side, essentially making the jump ring larger, the metal will be subjected to much more stress and you run the risk of breaking it. That would be a shame!
You do exactly the same with the eyelets of the head pins. Never bend the eyelet to the side, always forward or backward! And preferably as close to the eyelet as possible, but just enough to hang the pin or ring on.


Now hang your newly made head pin with bead and a new head pin on the jump ring. Bend the jump ring firmly closed. Now go back to step 1 and repeat until you reach the end of the necklace or bracelet! See the photos of the jewelry on the corresponding jewelry page under the inspiration heading as an example of the beading order. Take this necklace, for example.
Step 9
Once you've finished chaining the rest of the beads, we'll move on to attaching the clasp and the extension chain. Bend open a jump ring and hook your bracelet and the clasp onto the jump ring. Bend it closed again, making sure the jump rings close securely. This reduces the chance of losing it. Do the same with the extension chain.


Tip!
Do you have jewelry glue or clear nail polish at home? Then you can add a little drip a drop onto the ends of the ring. The space that Any remaining space will then be sealed with glue or nail polish. A tiny drop is enough. Let this dry thoroughly.
Do you have any questions or are you having trouble? Don't hesitate to send us a message. We're happy to help! You can always send us an email (info@littlebeadshop.nl) or message us on Instagram or Facebook.